- June 15, 2026
Vector vs Raster Files: What Printers Actually Need
Have you ever uploaded a logo that looked perfect on your computer, only to discover the printed version appeared blurry, pixelated, or missing important details? Many custom apparel projects run into problems because of confusion surrounding vector vs raster for printing. Choosing the wrong file type can affect print quality, color accuracy, scalability, and production efficiency, ultimately impacting the appearance of your finished apparel.
Understanding the differences between various artwork file types is essential when creating graphics for custom apparel. Whether you’re designing logos for businesses, promotional merchandise, event apparel, or Custom Printed T-Shirts, selecting the correct file format helps ensure professional results from the very beginning.
At Custom Tees Now, we review hundreds of artwork files every month and frequently see preventable issues caused by incorrect print file formats, low-resolution images, and misunderstandings about SVG vs PNG printing requirements. This guide explains everything you need to know about vector and raster graphics so you can prepare artwork confidently and achieve exceptional printing results.
Understanding the Core Differences Between Vector and Raster Images
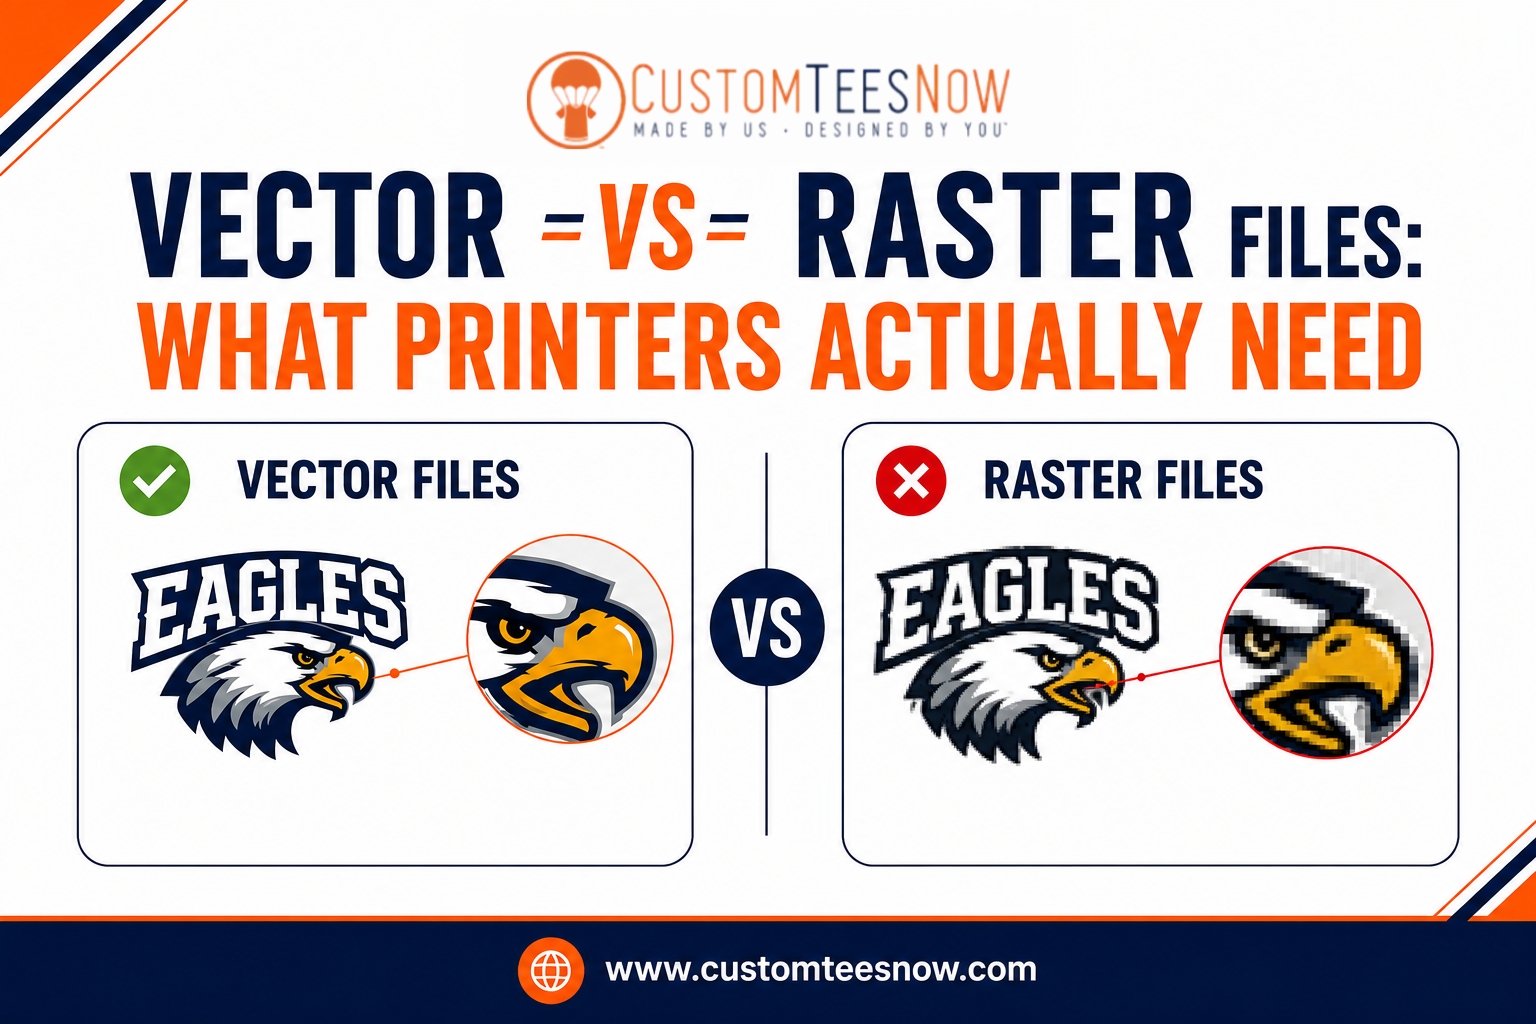
Vector and raster represent two fundamentally different ways of creating and storing digital graphics. Vector images rely on mathematical equations, paths, points, and curves to define shapes. This structure allows them to scale to any size— from a small pocket print to a large back design—without losing quality or developing jagged edges.
Raster images, by contrast, consist of a grid of individual pixels, each assigned a specific color. They excel at capturing complex details like photographs or intricate shading but have fixed resolution. Enlarging a raster file beyond its original dimensions causes pixelation, where the image becomes blocky and unprofessional.
In apparel decoration, especially screen printing, these differences become critical. Vector graphics facilitate clean color separations and precise ink application, while raster files demand careful management to maintain acceptable quality. Choosing incorrectly often leads to production challenges that could have been avoided with the right format from the start.
When to Choose Vector Graphics for Your Projects
Vector files shine in most custom apparel scenarios involving logos, text, illustrations, and branding elements. Because they remain resolution-independent, vectors ensure consistent sharpness regardless of the final print dimensions or garment size. Printers appreciate vectors for their ability to easily adjust colors, create spot color separations, and maintain crisp edges during the screen-making process.
Designs with solid areas of color, clean lines, and geometric shapes benefit most from this format. For team uniforms, corporate merchandise, or promotional items, vectors deliver the bold, professional appearance that screen printing highlights so effectively. Programs like Adobe Illustrator make it straightforward to build and refine these files while organizing elements for efficient production.
Even when minor raster elements appear in a design, embedding them within a primary vector structure often provides the best of both worlds. This hybrid approach maintains scalability while incorporating necessary photographic details.
The Role of Raster Files and Their Limitations in Printing
Raster graphics prove valuable for photorealistic images, complex gradients, or highly detailed artwork where pixel-level nuance adds depth. Formats in this category capture subtle shading and tonal variations that vectors struggle to replicate without conversion.
However, their limitations become apparent quickly in printing workflows. Low-resolution rasters lead to soft edges or visible pixels on fabric, particularly noticeable under the close scrutiny apparel receives. Achieving good results requires starting at high resolution—typically 300 DPI or more at the exact print size—and avoiding any upscaling.
For screen printing specifically, raster-heavy designs often need conversion to halftones or simulated process techniques, which can introduce graininess on textured fabrics if not handled expertly. Understanding these constraints helps designers decide when raster is appropriate and when to pivot toward vectors for superior outcomes.
Recommended File Formats and Technical Specifications
Printers generally prefer certain formats that preserve quality and streamline preparation. Vector options include AI (Adobe Illustrator native files), EPS (Encapsulated PostScript), and PDF files that maintain vector data. These allow full editability and reliable color management.
SVG offers a versatile vector alternative, though compatibility varies across systems. For raster needs, PNG provides transparency support with lossless compression, making it preferable over JPEG, which uses lossy compression that can degrade quality. TIFF serves high-end archival purposes but creates larger files.
Always match the format to the design’s complexity and the printing method. Providing files in the requested specifications reduces turnaround time and minimizes errors during color separation or plate creation.
print file formats play a decisive role in how smoothly your project moves from digital concept to finished garment, influencing everything from proof accuracy to final ink adhesion.
Comparing SVG vs PNG Printing Applications
Designers often evaluate options when preparing graphics that include both scalability and detail. SVG excels in scenarios requiring infinite resizing and clean outlines, such as logos or icons that must appear sharp across different garment sizes. Its XML-based structure keeps file sizes manageable while supporting layering for multi-color work.
PNG, on the other hand, handles transparency beautifully and preserves intricate pixel data, suiting print-and-cut applications or designs with soft edges and photographic elements. However, PNG remains resolution-dependent, so proper sizing at creation becomes essential to prevent quality loss during production.
The choice between them depends on the dominant characteristics of your artwork and the printer’s capabilities. For traditional screen printing, SVG aligns more closely with preferred workflows, while high-resolution PNG can support direct-to-garment methods effectively when vector alternatives aren’t feasible.
Color Management and Resolution Best Practices
Successful printing hinges on proper color handling alongside file type selection. Vector workflows typically use spot colors (such as Pantone references) for precise matching across screens, whereas raster files often start in RGB and require conversion to CMYK or spot separations.
Resolution standards vary by method but generally demand 300 DPI for raster elements at final size. Vectors bypass traditional DPI concerns due to their mathematical nature, yet designers should still define artboards at intended dimensions for accurate previews.
Additional considerations include outlining text, expanding strokes, and organizing layers by color. These steps ensure clean output regardless of whether the primary format is vector or raster.
| Scalability | Infinite, no quality loss | Fixed; enlarges with pixelation |
| Best For | Logos, text, clean illustrations | Photos, gradients, detailed art |
| File Size | Generally smaller | Larger, especially at high resolution |
| Editing Flexibility | Highly editable paths and colors | Pixel-level adjustments |
| Printing Preference | Ideal for screen printing | Suitable with high DPI for DTG |
| Common Formats | AI, EPS, PDF, SVG | PNG, JPEG, TIFF, PSD |
This comparison summarizes the practical implications for apparel projects and highlights why most professional printers emphasize one type over the other for optimal results.
Common Challenges and How to Overcome Them
Many projects encounter difficulties when files mix formats inappropriately or lack sufficient preparation. Low-resolution raster submissions frequently require recreation, while vectors containing embedded low-quality images inherit those problems.
To address these, begin designs in the most suitable format and maintain high standards throughout. When raster images must be incorporated, trace or recreate key elements as vectors where possible. Software tools offer image tracing features, though manual refinement often yields cleaner results for printing.
Communication with your printer early in the process provides valuable guidance tailored to their equipment and expertise. Requesting a proof allows verification of how the chosen file types translate to actual garments before full production.
Preparing Artwork Files for Professional Results
Follow a structured approach when creating or finalizing designs. Start by setting up the document with the correct color mode and artboard size matching the intended print area. Build primary elements as vectors for scalability, adding raster components only where essential and at adequate resolution.
Convert text to outlines and expand any effects to prevent font substitution issues. Name layers clearly by color to assist separations. Export in a format that preserves the necessary data—vectors as AI, EPS, or PDF, and high-quality rasters as PNG or TIFF with transparency if needed.
Including a garment mockup alongside the technical file helps printers visualize the final application and catch placement or sizing concerns promptly.
artwork file types significantly affect how efficiently production teams can prepare screens and achieve consistent ink deposit across your order.
Collaborating Successfully with Your Printer
Experienced printers like those at Custom Tees Now review submitted files thoroughly and offer suggestions to optimize them for the best possible outcome. Providing detailed specifications—garment type, print locations, quantities, and any special effects—facilitates smoother workflows and reduces revisions.
Many teams appreciate receiving both the native working file and a flattened print-ready version. This practice supports efficient color management while allowing future edits when needed. Building a collaborative relationship ensures your creative vision translates accurately into high-quality custom apparel.
For practical vector workflow tips, Adobe’s official learning resources at helpx.adobe.com provide excellent tutorials. The Creative Bloq design site also features in-depth articles on file preparation best practices for professional printing.
Elevating Your Custom Apparel Projects
Mastering vector vs raster for printing empowers you to create designs that perform reliably across production methods. Vectors generally provide the versatility and quality most screen printing projects demand, while strategically used high-resolution rasters expand creative possibilities for more complex visuals.
By selecting appropriate formats, maintaining technical standards, and collaborating closely with production partners, you minimize risks and maximize the impact of your custom shirts, hoodies, and other garments. The result is apparel that not only looks exceptional but also stands up to repeated wear and washing.
Ready to transform your ideas into professional, eye-catching products? Custom Tees Now delivers expert guidance on file preparation, superior screen printing services, and personalized support to bring your vision to life with outstanding quality. Explore our artwork preparation guide or contact the team today to start your next successful project with confidence.